TODAY'S GOALS
Recognize the difference between USB ports and the Ethernet port
Learn how to plug in an external Flash Drive into a USB port
Learn how to safely eject a Flash Drive without damaging it or the files on it
Learn how to save a file to the Flash Drive, not the hard disk on the computer
Begin to understand the basics of Microsoft Publisher.
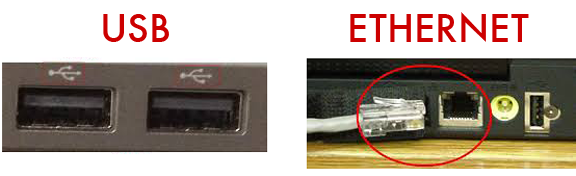
FLASH DRIVES USE THE USB PORT
The flash drives we use swivel to open and close.
RULES FOR USING THE COMPUTER
- DO NO HARM - no food, liquid, slamming shut or anything that can cause damage.
- Visit sites and do searches only as allowed by Ms. Noll or another instructor or teacher.
- Make sure the computer is fully powered up (you see the desktop) before inserting the flash drive, or the computer may not recognize it.
- Do not force the flash drive if you are having trouble inserting it into the port.
- Do not twist the flash drive as you connect to or disconnect from the computer. Push it straight in; pull it straight out.
- To disconnect a flash drive, follow the instructions found at your desk to perform Safe Eject.
- Do not save files to anything but your flash drive. Files found on the computer are deleted.
- Return the flash drive at the end of class for collection.
- Do not shut down your computer, until you have done a Safe Eject of the flash drive.
- If you are unsure about anything, ask FIRST!
USING PUBLISHER
- Open a blank new document
- Insert a shape
- Resize the shape to make it larger or smaller, but maintain its proportions.
- Add text inside the square.
- Save your file to the flash drive using your full name and today's date as the filename.
- Close Publisher.
- Perform a SAFE EJECT to disconnect the flash drive.
- Connect the flash drive again and verify that your file was saved to it.
- Make any changes you want or begin creating your logo in Publisher.
- Save your file.
- Do a Safe Eject of the flash drive.
- Shut down your computer.